Linux is known most famously for freedom (free as in free speech, not free beer). It will allow you to do anything to your system, which goes to such an extent that it even implodes if you tell it to. This freedom is mainly accessible to the users through the operating system’s shell (shell can be thought of as the interface to the operating system). This shell is usually Bash, but again, thanks to the freedom, that’s not necessary.
Today, we will explore an alternative shell called Z Shell that has been gaining a lot of attention and popularity recently, and for a good reason. We will also see how it is different from our good ol’ Bash.
Zsh introduction
Paul Falstad created zsh in 1990. If you thought Zsh is much newer than Bash, that’s not the case, as Bash was developed in 1988. It was named after the login ID of a Yale professor, Zhong Shao. It was initially developed as a subset of Csh, but it eventually crossed over with Tcsh and Ksh and now has become a shell exceeding even Bash in certain respects.
It had always been popular among some userbases, but it gained popularity when Apple adopted it as the default shell for their Mac OS Catalina in 2019. Even Kali Linux made it the default with their 2020.4 release.
Zsh was designed with better user interaction in mind. The features that default Zsh has over default Bash are aimed to make the shell more interactive, making it much more accessible and usable for users of all experience levels. It has specific differences in terms of scripting from Bash, but that doesn’t pose a problem. Zsh in itself is also a compelling scripting language.
Bash vs. Zsh – key feature differences
1. Autocompletion
The most critical and frequent feature that makes users flock to Zsh is its autocompletion feature. Please make no mistake, Bash has an autocomplete feature, but it works differently from Zsh. For an example of Bash, say you want to go to the Downloads directory. To do that, the entire command is:
cd Downloads/
But even if you type:
cd Down[Tab]
Assuming that there are no other directories that start with “Down-,” Bash will autocomplete the name “Downloads” right after you press Tab. So far, so good. But say you only type in “D-” and press Tab. What then? Assuming you have a usual home directory, at least three directories will start with a “D” – Downloads, Desktop, and Documents. So what Bash does is show you all the options that begin with a “D,” and you have to choose one and type it in.

Bash Autocompletion
So how is Zsh different? Conforming to the point of making Zsh more interactive, it lets you cycle through all the options using the Tab key and choose one just with the press of the Enter key.
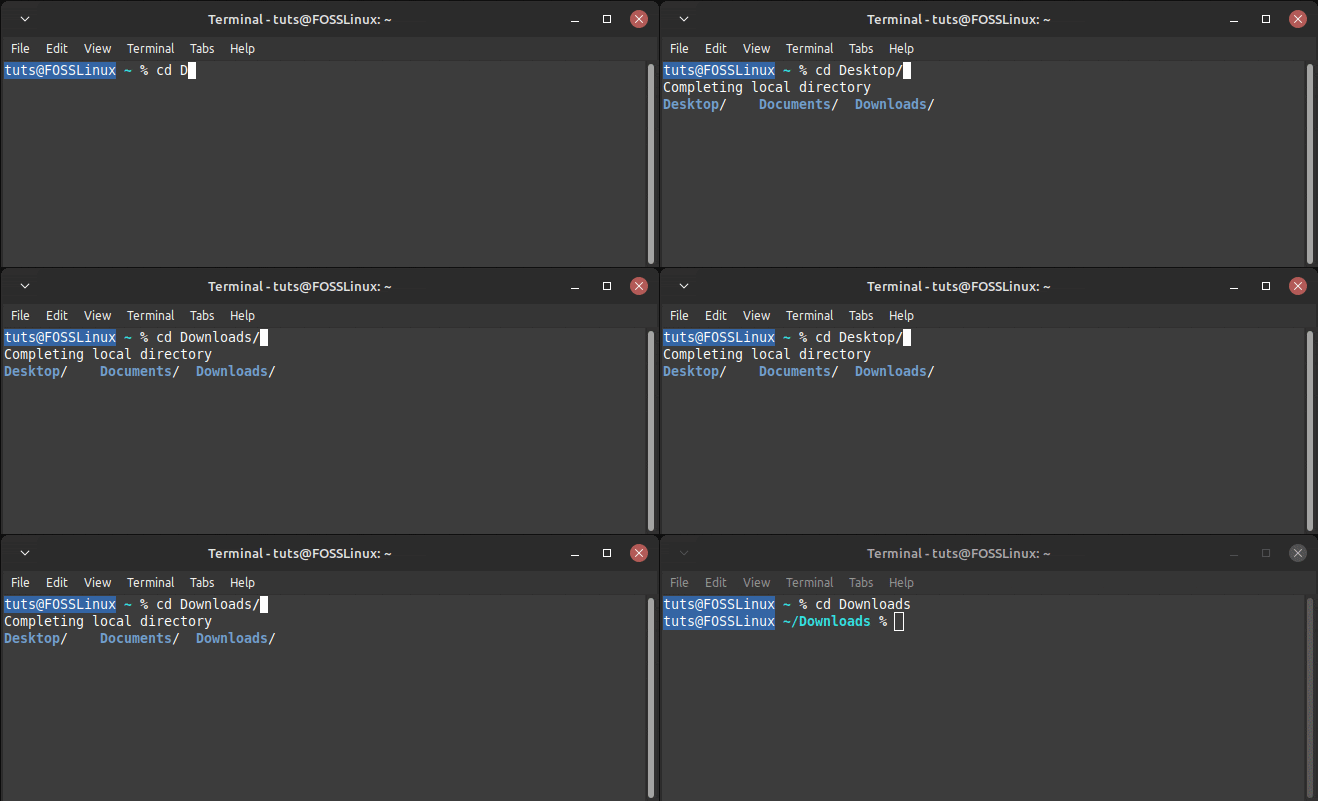
Zsh Autocompletion
This is not only limited to autocompletion of filenames. This applies to various commands as well. For example:
Kill command
One brilliant usage of this feature can be seen with the kill command. The kill command is used to “kill” a process in Linux. Any process, responsive or unresponsive, can be eliminated with this command. You need to know the PID (Process ID) of the process you want to eliminate. For example, if I want to eliminate my opened instance of Thunar, the file manager. For that, I will need to know the PID of Thunar. That can be figured out with this command:
ps aux | grep [Application Name]
So, in this case:
ps aux | grep Thunar
Here, the first result is the actual process. You will notice a “grep” on the second process, which is the process that we ran. That means the second process is just us searching for the first one. You can ignore the last one in most cases.

Thunar PID
This will show me the PID. Now, to eliminate, I need to use the kill command:
kill [PID]
So that becomes:
kill 4563
But Zsh makes the process much easier. Just type in kill and keep pressing Tab, and Zsh will let you cycle through the running process. Choose one using the Enter key and kill it immediately.
One might argue that you can kill a process directly using the pkill command, which lets you kill commands using their name. So I could enter:
pkill Thunar*
And Bash will kill all processes starting with “Thunar.” But the problem remains that you might not always know what the process is named without searching it before and remembering it. Zsh’s cycling through all processes makes it much more manageable.
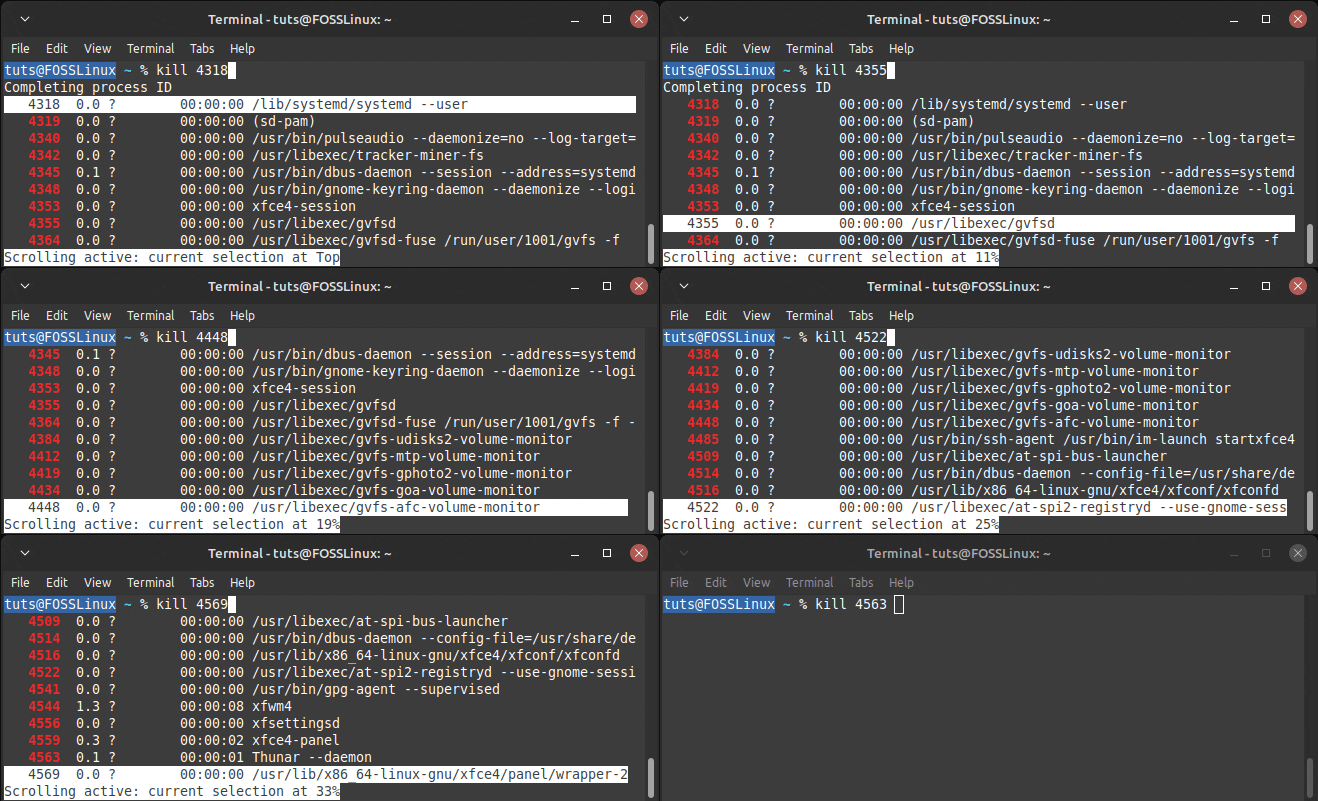
Zsh kill Command
2. Prompt configuration
Zsh provides many more options for prompt configuration as compared to Bash. For example, you can represent a relatively common prompt configuration using this as the PS1 variable:
PS1='%n@%m %F{red}%/%f $ 'This shows the prompt as:

Zsh Example Prompt Configuration
The key notable difference from a .bashrc is that it uses ampercent ‘%’ character instead of backslash ‘\’ to integrate different values into the prompt. The character ‘n’ denotes username and ‘m’ the machine’s name. Bash has a limited number of such variable holders, but Zsh goes all out.
Options include a whole lot of information about VCS in use (like Git) (more about that here), history token number being used, number of jobs (background processes started deliberately by the user), and text formatting like underline, bold, etc., and even conditional strings. You can find information about the plethora of options on their documentation here. You can even have a different display on the right and left sides of the screen; that is how customizable Zsh is.
Syntax highlighting
One major configuration offered by Zsh that users love is syntax highlighting. With the help of a plugin (more on that later), Zsh can highlight the syntax of terminal commands as they are being typed in.
3. Autocorrection
This issue is faced by users quite often. You mistakenly enter the test.oy instead of test.py, and the command doesn’t run. It isn’t a huge problem, but it sure is a pain to enter or correct the command again. Zsh offers a solution. It avails autocorrection of commands and filenames if they are entered slightly incorrectly. For example, if I am trying to create a directory called zshautocorrect:
mkdir zshautocorrect
But I “accidentally” enter nkdir in the place of mkdir:
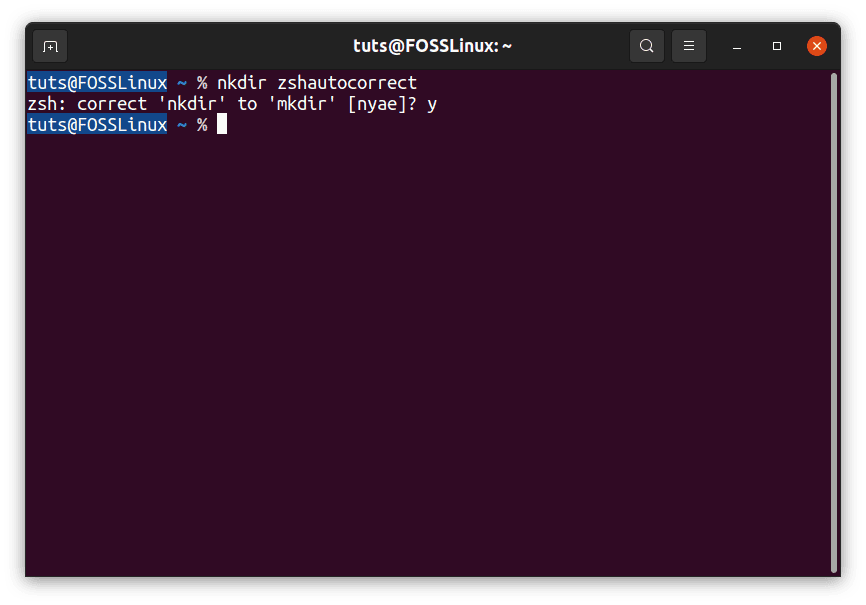
Zsh Autocorrect Example
Zsh offers a correction, which you can decide for yourself.
4. Plugins
We are finally at the point where Zsh has much more potential than Bash. Plugins.
As you probably already know, plugins are little pieces of software that can be added to existing software to extend its functionality. While Zsh provides much more than Bash already with its current code, adding plugins can add features you didn’t know you wanted. For example, the already mentioned syntax highlighting. Apart from that, there are plugins for history-based completion, autosuggestions, Git-related ones, etc. The plugins don’t just focus on function; there are even ones that focus on form, like the famous powerlevel10k theme.
There are a lot of plugins that you can manually search for and discover. If installing, uninstalling, and managing so many things sounds daunting, worry not because the community still has your back. There are plugin managers available for Zsh as well. And hey, if you don’t want to get plugins one at a time, you can even use scripts that will install a set of plugins and give you a great experience overall. This brings us to our next subtopic.
Oh My Zsh
We can’t talk about Zsh without mentioning Oh My Zsh.
Zsh is great and expandable, but sometimes people don’t want to spend a lot of time figuring out a great configuration. We want a preconfigured framework of settings and extensions that can add functionality without much hassle. Oh My Zsh features over a whopping 275 plugins that make your Zsh prompt as extensive as can be. If you are seriously considering taking full advantage of Zsh, maybe Oh My Zsh is for you. Either way, you can try it and see for yourself.
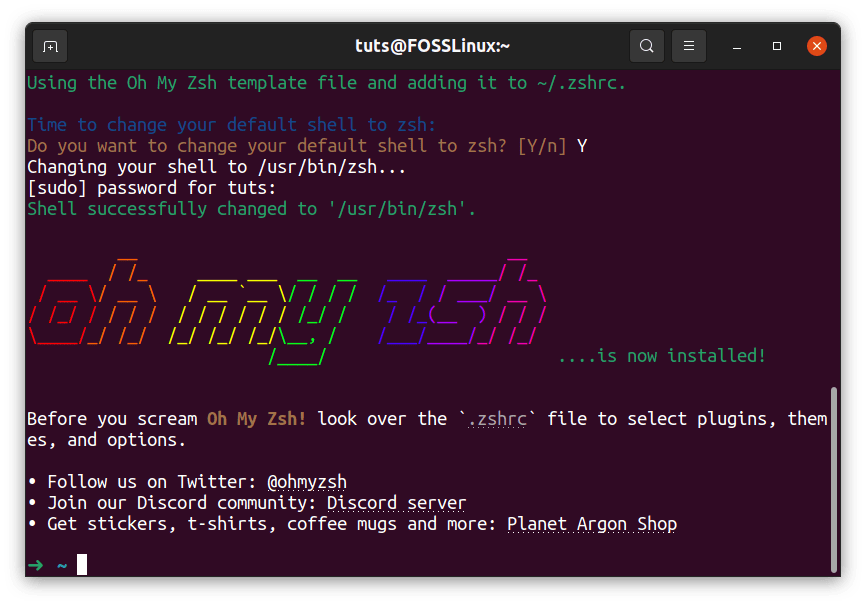
Oh My Zsh First Screen
To install, you need Git. If you don’t already have it installed, use the default package manager to install it. For example, on Ubuntu and Debian based distributions, the command will be:
sudo apt install git
Now to install Oh My Zsh, enter:
sh -c "$(wget https://raw.github.com/ohmyzsh/ohmyzsh/master/tools/install.sh -O -)"
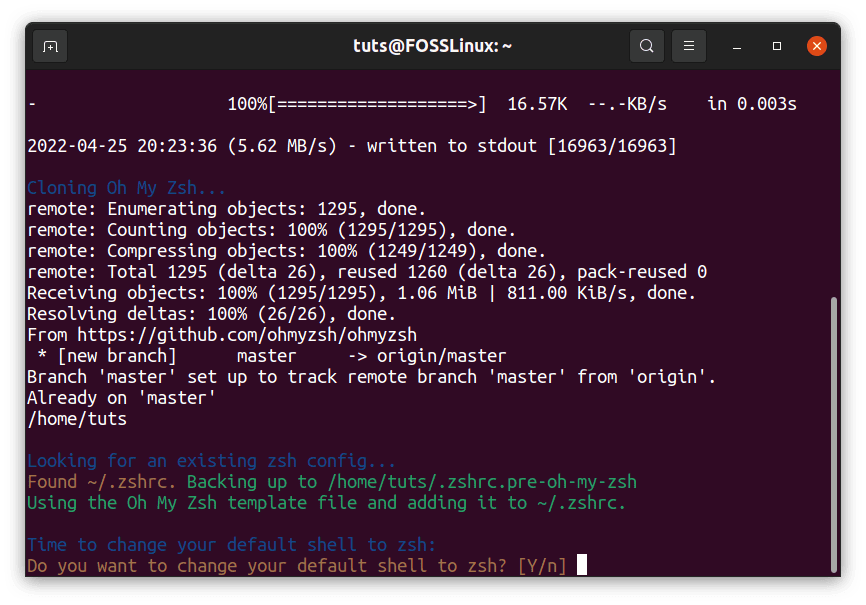
Oh My Zsh Installation
If you don’t like how it feels, remove Oh My Zsh simply by running this command in the Zsh command line:
uninstall_oh_my_zsh
5. Floating-point arithmetic
One of the major shortcomings of Bash is that you cannot perform floating-point arithmetic using the built-in commands. Although you can do that using the external command bc, that doesn’t fare well in long-term or complicated scripting situations. For example, here:
echo $((2 + 3))
echo $((2.1 + 3))
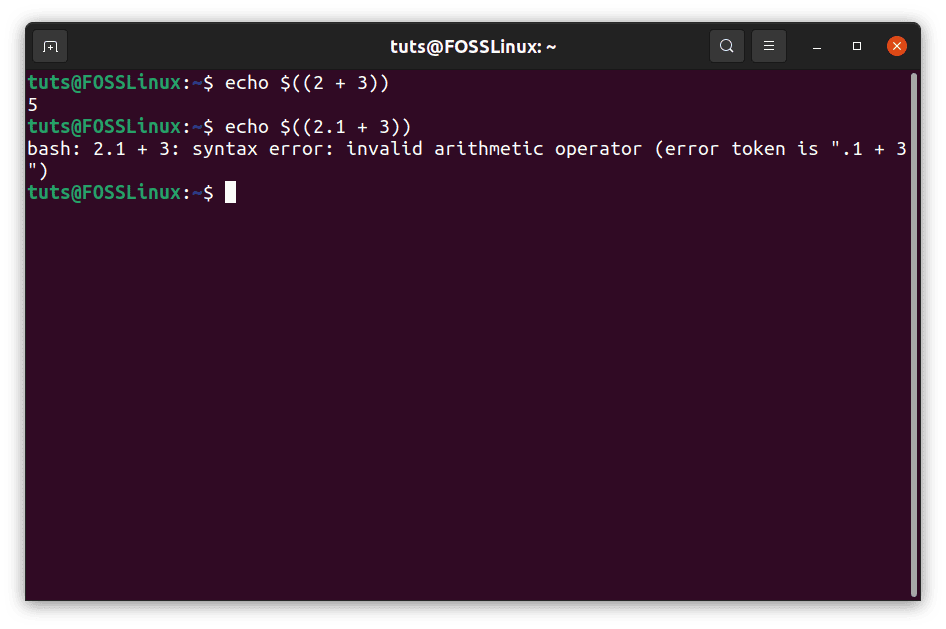
Bash Floating-Point Arithmetic
But Zsh, on the other hand, can (more or less) deal with floating-point arithmetic:

Zsh Floating-Point Arithmetic
This is a significant win if you often have to work with numbers and incorporate them into your day-to-day usage.
6. Installation
While Zsh comes as default on Mac OS and Kali Linux, it doesn’t come preinstalled on most Linux distributions. To install Zsh:
Debian, Ubuntu, and their derivatives
The simple installation command should do:
sudo apt install zsh
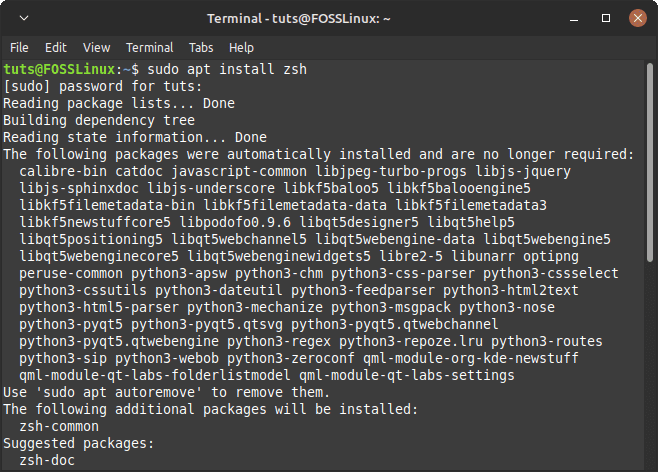
Zsh Installation
Fedora and Derivatives
The DNF equivalent of the earlier command:
sudo dnf install zsh
Arch and derivatives
Enter the command:
sudo pacman -Syu zsh
Other distributions
There is no centralized page for installation instructions, but a simple web search should fetch you the details.
Configuration
The first thing you have to (non-optionally) do after installing Zsh is set it up. You will be met with a screen like this:
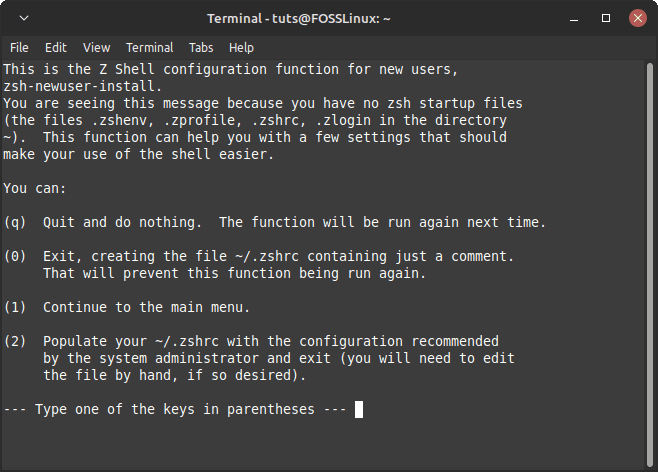
Zsh First Start
If you want to configure little details by yourself, choose option 1. You will be presented with another menu with multiple sub-menus. You will be able to control details like history, completion, key bindings, some binary shell options, etc.
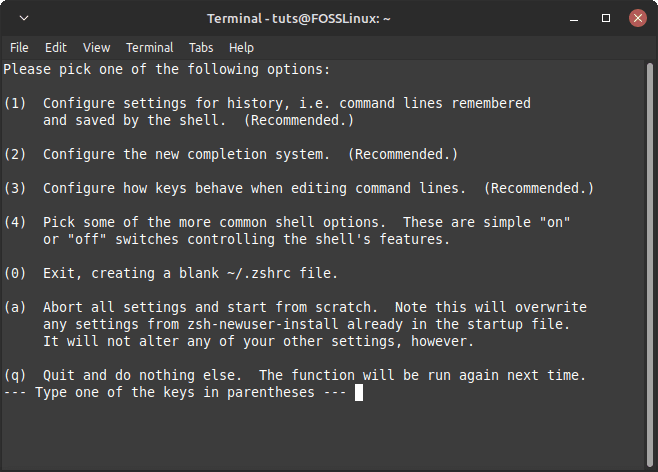
Zsh Configuration Menu
We don’t recommend option 0 of having anything in the configuration file because that will leave you with a monotonous prompt. If you don’t want to go into the details while setting up, better choose option 2.
Setting as default
Now that you’ve seen what Zsh can offer over Bash, you might want to change to Zsh as the default shell if you want it to stick around. This is not that great a deal, and it won’t damage your system so that you can put that thought out of your mind. It is a pretty simple command:
chsh -s $(which zsh)
The command zsh gets the location of the executable file for Zsh, which is then set as the location for the new default shell. It will ask you for your password, and that’s all. Now you are officially a Zsh user.
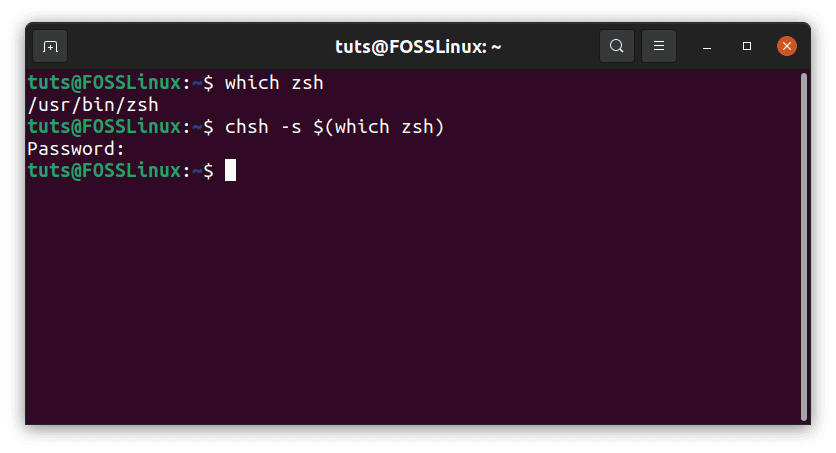
Default Shell Change
Conclusion
After using Linux for a while, users tend to get a bit experimental, and Zsh is a perfect example of why that is a great thing. Zsh adds some features that are beautifully executed and highly appreciated by a majority of the users. So it was bound to gain the popularity that it is receiving now. Zsh has even more features over Bash like advanced globbing, different startup files configuration, etc. We encourage you to explore these differences if you intend to embrace Zsh. We hope that this article was helpful to you. Cheers!

